Decorating your home doesn’t have to break the bank. If you love a creative touch and want to infuse personality into your space, cardboard wall decor is an amazing solution. Not only is cardboard inexpensive and easy to work with, but it also offers endless possibilities for DIY enthusiasts. From modern geometric designs to bohemian-inspired wall hangings, cardboard can be transformed into impressive artwork that looks far more expensive than it actually is.

In this blog post, we will explore 10 DIY cardboard wall decor ideas that are both cheap and stylish. Whether you are decorating your bedroom, living room, or even a home office, these projects are fun, easy, and perfect for anyone who loves hands-on crafts.
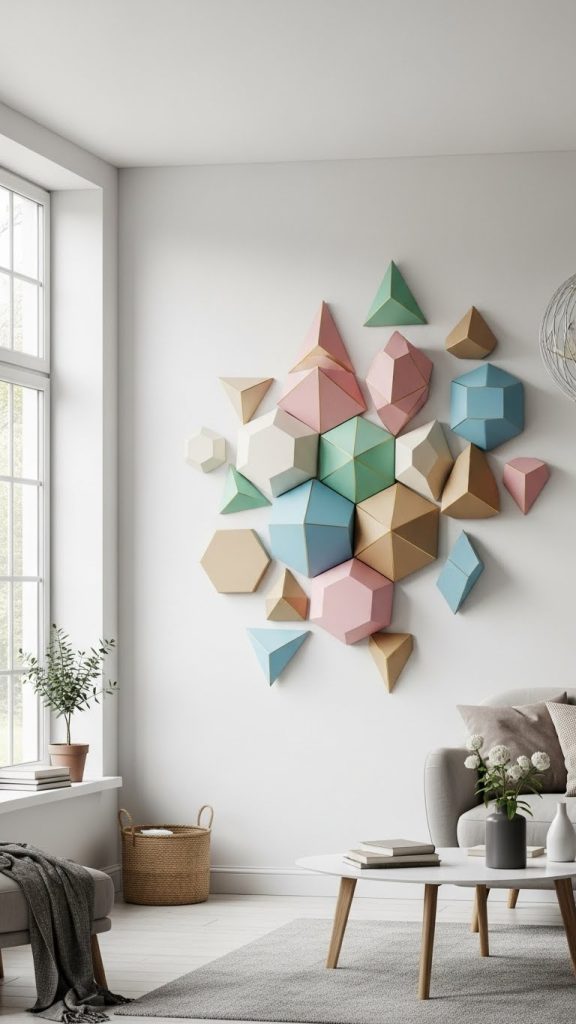
1. Geometric Wall Art
Geometric patterns are a modern and minimalistic way to enhance any wall. Cardboard makes it easy to create three-dimensional geometric shapes like triangles, hexagons, and cubes.
Materials Needed:
- Cardboard sheets
- Craft knife or scissors
- Ruler and pencil
- Acrylic paint or spray paint
- Hot glue or craft glue
Steps:
- Sketch your geometric shapes on the cardboard.
- Cut out each shape carefully with a craft knife.
- Paint each piece in your desired color palette.
- Once dry, assemble the shapes on your wall using glue or removable adhesive hooks.
Tips: Use a mix of sizes and colors to create a dynamic pattern that becomes a focal point in the room. You can also add metallic paints for a more glamorous touch.
2. Cardboard Letter Wall
Personalized wall decor is always a hit. Using cardboard letters is a simple way to display your name, a favorite quote, or an inspiring word.
Materials Needed:
- Cardboard
- Pencil
- Scissors or craft knife
- Paint, glitter, or decorative paper
- Glue
Steps:
- Draw letters on cardboard. You can print a template and trace it for uniformity.
- Cut out the letters.
- Decorate each letter with paint, patterned paper, or glitter.
- Mount the letters on the wall using double-sided tape or small nails.
Tips: Combine cardboard letters with photos or small geometric shapes for a gallery wall effect.

3. Cardboard Photo Frames
Create unique photo displays without spending money on frames. Cardboard can be cut and decorated to match your interior style.
Materials Needed:
- Cardboard sheets
- Craft knife or scissors
- Paint or decorative paper
- Glue
- Small clips or string for hanging photos
Steps:
- Cut the cardboard into the desired frame shape and size.
- Paint or cover the frames with decorative paper.
- Attach photos using glue, clips, or string.
- Arrange the frames on your wall in a grid or cluster pattern.
Tips: For a modern look, use black cardboard and metallic paint. For a cozy vibe, try pastel colors or scrapbook paper.

4. 3D Cardboard Wall Flowers
Cardboard flowers are perfect for adding a feminine and whimsical touch to your room. You can create a bouquet effect directly on your wall.
Materials Needed:
- Cardboard
- Scissors
- Hot glue
- Paint or markers
Steps:
- Cut out petal shapes from cardboard in various sizes.
- Layer and glue petals together to form flowers.
- Paint or decorate each flower as desired.
- Attach the flowers to your wall with glue or removable hooks.
Tips: Mix flower sizes and colors to make your wall art look natural and lively. This is also a great project for crafting with kids.

5. Cardboard Wall Shelves
Functional and stylish, cardboard wall shelves can hold lightweight items while serving as decor. These shelves are perfect for small plants, candles, or decorative figurines.
Materials Needed:
- Thick cardboard
- Ruler and pencil
- Craft knife
- Glue or double-sided tape
- Paint (optional)
Steps:
- Measure and cut the cardboard into shelf shapes.
- Fold and layer the cardboard for strength.
- Paint or cover with decorative paper.
- Mount on the wall using strong adhesive strips.
Tips: Reinforce the shelves with extra layers of cardboard to ensure they can hold weight. You can also create floating cube shelves for a modern geometric look.

6. Cardboard Wall Mandala
Mandala designs are intricate, mesmerizing, and make a stunning focal point. Cardboard is an excellent medium to try this project without spending a fortune.
Materials Needed:
- Cardboard
- Pencil and compass for circles
- Craft knife
- Paint or markers
- Glue
Steps:
- Draw concentric circles and patterns on cardboard.
- Cut out each section carefully.
- Decorate each piece with paint or markers.
- Assemble the pieces on the wall to form the mandala.
Tips: Start with a simple design if you are a beginner. Use metallic or contrasting colors to make your mandala pop.

7. Cardboard Wall Map
If you love travel, a cardboard wall map is a creative way to showcase your adventures. You can customize the map size and add your personal touch.
Materials Needed:
- Cardboard
- Pencil
- Craft knife
- Paint or decorative paper
- Push pins or markers
Steps:
- Sketch your favorite map or continents onto cardboard.
- Cut out each section carefully.
- Paint or decorate the pieces.
- Mount the map pieces on your wall and add pins to mark places you’ve visited.
Tips: This project works well as a gallery-style installation, combining the map with travel photos.

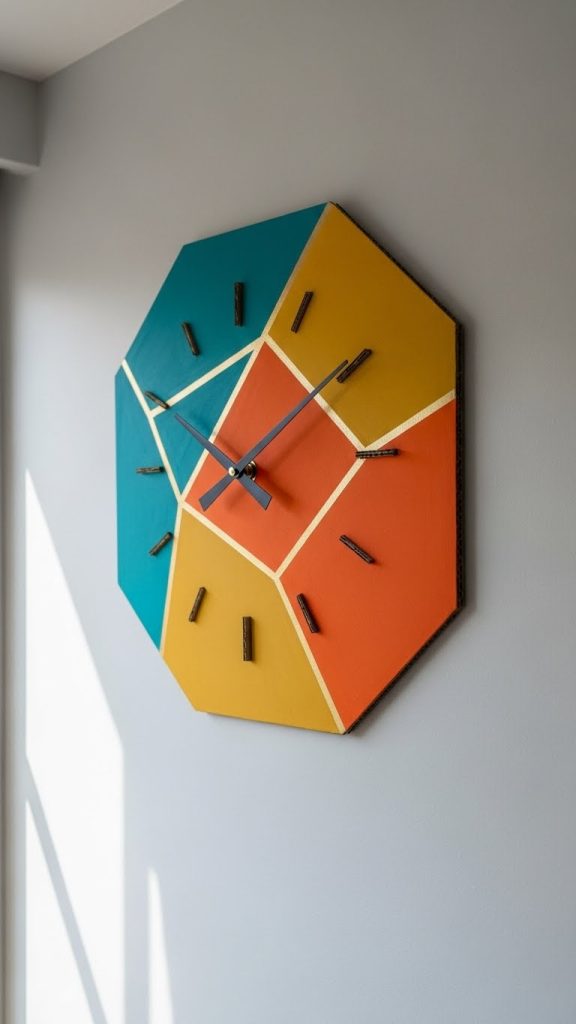
8. Cardboard Wall Clock
A DIY cardboard wall clock can be both practical and artistic. You can design it to match your room’s theme and style.
Materials Needed:
- Cardboard
- Clock mechanism kit
- Craft knife
- Paint or decorative paper
- Ruler and pencil
Steps:
- Cut a circular or unique shaped base from cardboard.
- Decorate with paint or paper.
- Drill a hole in the center and insert the clock mechanism.
- Hang your new wall clock on the wall.
Tips: Use bold colors or geometric patterns to make your clock a statement piece.
9. Cardboard Wall Panels
Wall panels create a textured, high-end look without the cost of real wood or tiles. Cardboard panels are lightweight and easy to customize.
Materials Needed:
- Large cardboard sheets
- Ruler and pencil
- Craft knife
- Paint or wallpaper
- Glue
Steps:
- Cut cardboard sheets into squares, rectangles, or any shape.
- Paint or decorate each panel individually.
- Attach panels to the wall in a grid, staggered, or pattern layout.
Tips: Try mixing textures like corrugated cardboard with smooth cardboard for a more dimensional effect.

10. Cardboard Wall Sculpture
For a bold, artistic statement, create a 3D cardboard wall sculpture. This could be an abstract shape, an animal silhouette, or a geometric design.
Materials Needed:
- Thick cardboard
- Pencil and ruler
- Craft knife or scissors
- Glue
- Paint
Steps:
- Sketch your design on cardboard.
- Cut out all pieces and assemble in layers for a 3D effect.
- Paint or decorate as desired.
- Secure to your wall using nails, screws, or strong adhesive.
Tips: Play with shadows by creating layers and angles. A 3D sculpture becomes an eye-catching centerpiece in any room.

Why Choose Cardboard for Wall Decor?
- Affordable: Cardboard is extremely cheap or even free if you reuse packaging.
- Lightweight: Easy to hang without heavy hardware.
- Eco-Friendly: Reuse cardboard and reduce waste.
- Customizable: Paint, cut, and shape it to fit any style.
- Fun Project: Perfect for DIY enthusiasts and family crafting.
Final Tips for DIY Cardboard Wall Decor
- Reinforce for Longevity: Double up cardboard layers for heavier pieces.
- Use Removable Adhesives: Prevent wall damage if you like changing designs.
- Combine Techniques: Mix painting, layering, and 3D elements for unique results.
- Experiment with Colors: Even simple cardboard can pop with bright colors or metallic finishes.
- Get Creative with Patterns: Don’t be afraid to mix geometric shapes, flowers, and letters for an eclectic wall.
DIY cardboard wall decor is a budget-friendly way to personalize your home. Whether you love minimalist designs, bold 3D art, or personalized lettering, cardboard can be transformed into beautiful wall decor that impresses without spending a fortune. These 10 DIY ideas are perfect for anyone looking to add charm, personality, and creativity to their walls.
Start with one project, and soon your walls will tell a story of creativity, resourcefulness, and style—all thanks to a humble piece of cardboard.